Game #5
In Game #5, Red would demonstrate several middle game tactics and skills in basic kills in order to win the game.

1. C8=5 C2=5
2. H8+7 H2+3
3. R9+1 R1=2
4. R9=4 A6+5
5. R4+7 H8+9
The first five moves are the same as in the previous examples. Diagram 1.5a. Please refer to Game #1 for detailed explanations.

Diagram 1.5a
6. P3+1 R2+4
Diagram 1.5b. Blacks had learnt from his previous games that R2+6 was weak. R2+4 was an attempt to improve, but it was still far from perfect. C8=7 would be advised for Black, because Black would have the option to play R2+4 anytime. Once C8=7 was played, Black's next move would be R9=8, which would gain initiative for Black and allowing faster development of the pieces on this side of the board. Moreover, C8=7 would also discourage Red from playing H2+3. If Red insisted on H2+3 after Black C8=7, Black would push his pawn forward with P7+1, thereby threatening Red horse directly.

Diagram 1.5b
7. H2+3 C8=6
8. H3+2 P7+1
9. P3+1 R2=7
10. E3+1 …………
Diagram 1.5c. Red’s E3+1 was to prepare for R1=3, offering to trade and remove Black's only functional piece, the riverbank chariot, from the board. This strategy is still often used in Xiangqi nowadays, whereby a relatively weaker piece is used to exchange for a threatening enemy piece. This would allow for future gains.

Diagram 1.5c
10. ………… P3+1
11. A4+5 …………
Red A4+5 was a waiting move. Red was hoping that Black would make a mistake.
11. ………… R7+2
And to Red's delight, Black did play R7+2, which was a huge mistake. Diagram 1.5d. Black had planned to capture the Red horse and cannon at the same time, but forgot about the fact that this would allow the Red horse to move forward and become a threat.

Diagram 1.5d
12. H2+4 R7=8
R7=8 was a weak move. A better move would be R7-2 which would offer more defense.
13. H4+6 C5=4
14. C5+4 E3+5
15. C2=5 …………
It would seem that Red’s C2=5 would seem cowardly, running away from the Black chariot, but in actual fact, Red was actually executing his plan. Diagram 1.5e.

Diagram 1.5e
15. ………… H9+7
16. C+=4 …………
C+=4 was an excellent move! Diagram 1.5f. Red ignored the threat by the Black horse to capture his chariot, and instead chose to attack with C+=4.

Diagram 1.5f
16. ………… H7-6
If E5-3, Red would checkmate with R4+1. Diagram 1.5g.

Diagram 1.5g
17. C5+5 K5=6
If Black countered with A5-6, Red would reply with C4=5 for the Double Cannons Checkmate.
18. C5=7
And Black would not be able to stop Red's C7+2 checkmate on the next move. Diagram 1.5h.
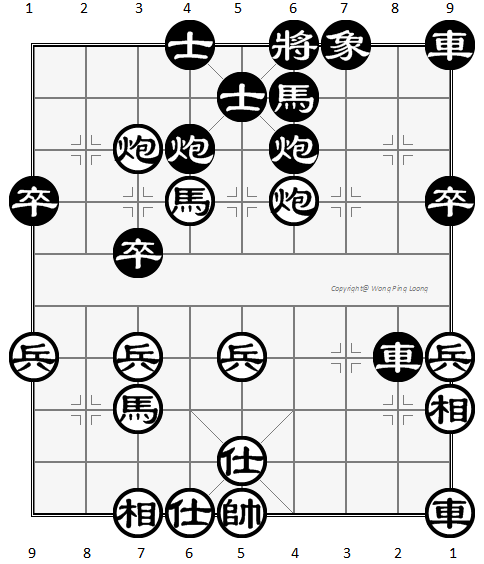
Diagram 1.5h
End of Book - Free Edition
If you would like to buy full version - The XiangQi Master From The Cave. Please click on the link below.
No comments:
Post a Comment